Git and GitHub: Comprehensive Guide for Beginners
Become Pro Git and GitHub User, Understand Git and GitHub workflow


Table of contents
- General Overview of Git and GitHub
- Git Installation and GitHub Account Creation
- Git Configurations
- Git Initialization (git init):
- Staging and Commit
- Git status and Git Log
- Creating a Repository on GitHub
- Connecting Local Repo to Remote Repo
- Git Pushing (git push)
- Git pull
- Branching and Pull Request
- Switching Branches
- Summary:
One of the great tools you will use daily as a developer is Git and GitHub, however as a beginner, at first you will be faced with a lot of challenges in understanding Git, GitHub, and how everything works. In this article, I have provided you with insights that will guide you toward understanding the GitHub workflow and becoming a Pro Git and GitHub user.
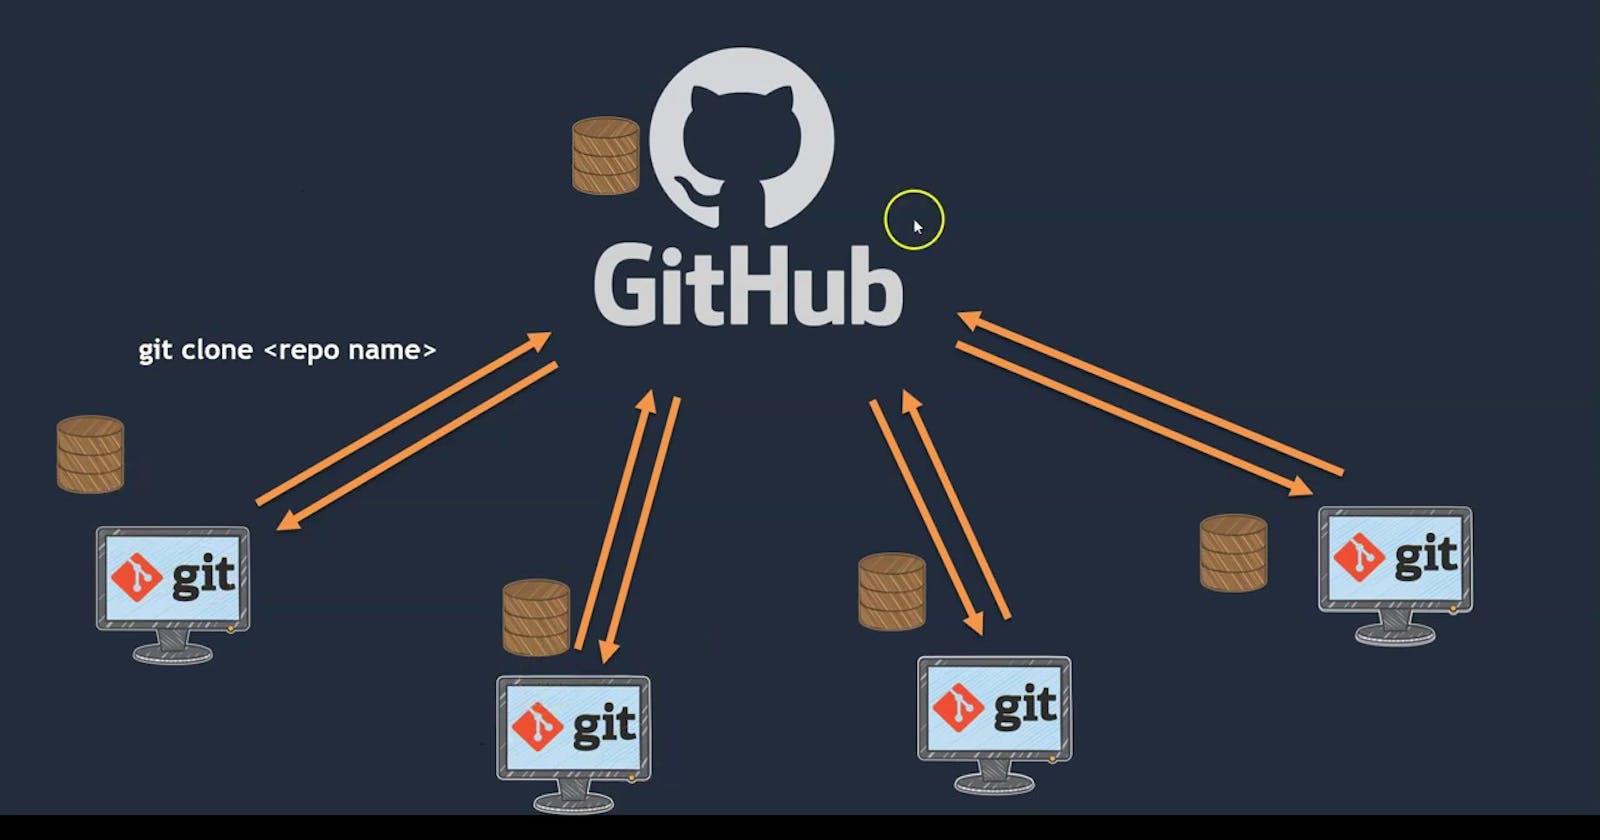
General Overview of Git and GitHub
**Git: ** Is a distributed version control and source code management system that keeps track of changes in any set of files, usually used for coordinating work among programmers collaboratively developing source code during software development. Thus you have a record of what has been done, and you can revert to specific versions should you ever need to and you can also know who did the changes. Git provides a mechanism for multiple people(developers) to work on different offline copies(Local Repository) of the same code project, and then (relatively) easily merge the various copies/version of the project together at a later point in time.
GitHub: This is an internet hosting service, It provides the distributed version control of Git (Git hosting service). They handle all the server-side stuff and provide a nice web interface. They provide the developer with Remote Repository that connects with the Git Local Repository
Source: i.stack
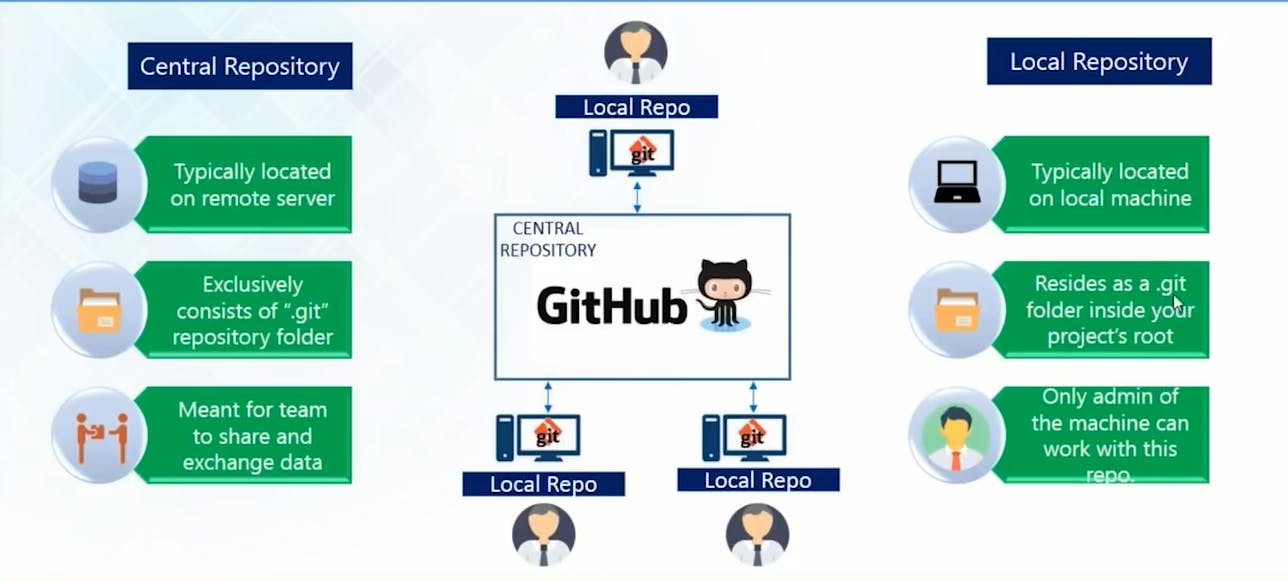
Repository (Repo): Is a place, directory/folder where code is stored. We can call it a code base. You will hear of these terms, Local and Remote Repo, a lot as you work with developers using Git and GitHub
Local Repo: This is the repo stored Offline (locally) in your machines (laptops, Desktops, etc).
Remote Repo: This is the repo stored Online (Remotely) in your GitHub.
Git Installation and GitHub Account Creation
Install Git: The installation of git will vary based on your Operating System (OS), visit the git documentation here for the step-by-step process to follow to install git on your chosen OS Install Git
GitHub Account: Go to the official GitHub website and sign up using your email, password, and other required details GitHub-Site.
Yeyyy!!!, You now have a GitHub account...
Git Configurations
Now that you have installed Git and created your GitHub account, let's configure and set up Git to synchronize and work with your GitHub account.
Go to your machine (Laptop, Desktop, etc), locate your terminal, and type in the following git commands:
git config --global user.name “[YourGithubUserName]”

git config --global user.email “[YourGithubEmail]”
The above commands set a name that is identifiable for credit when reviewing version history and an email address that will be associated with each history marker
This is how my code will look like using my GitHub username and email
git config --global user.name  MarsIfeanyi

git config --global user.email  marschalice@gmail.com
From the screenshot above you can see the that the:
Author = (user.name)(user.email)

(user.name) = MarsIfeanyi
(user.email) = marschalice@gmail.com
Thus anytime you made a **Commit **(save changes to code snapshots) it gets registered with a name(GitHub username) and email address associated with it. Thus with this, your and your team can actually know who made changes/contributions and when (Time and Date).
Git Initialization (git init):
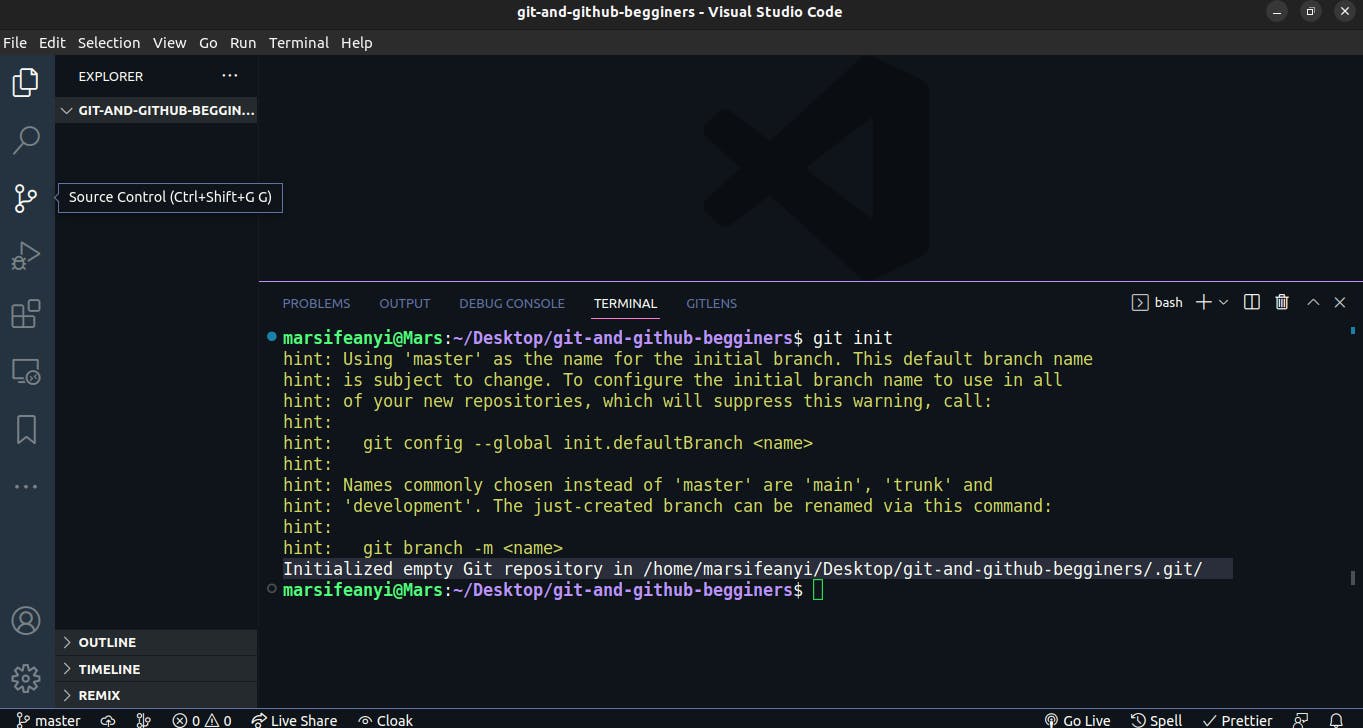
git init: Creates or initializes an empty repository in your machine (local repo), when you run this command Git creates a hidden directory called .git, which stores all of the objects and refs that Git uses and creates as a part of your project's history.
To understand clearly how this works, create a folder (give it any name you like) on your desktop or any location of your choice on your machine. Then open up the folder you created using any text editor of your choice. Then type in the command below and press enter key.
git init
This is what my setup looks like after entering the git init command.
It initialized an empty Git repository in /home/marsifeanyi/Desktop/git-and-github-begginers/.git/.
Where: **git-and-github-begginers ** is the name of the folder I created on my desktop and .git is the hidden directory created by Git
Staging and Commit
Now that we have created an empty git repo in our folder, let's create an index.html file with **h1 **tag with any content your choice and tell git to save it for us and then keep track of the changes anyone makes in this file.
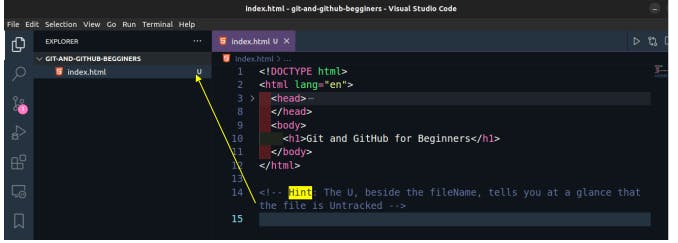
Our index.html file is currently Untracked. Let's tell Git to start tracking it
Take note of these initials beside your fileName when you are working with Git
U = Untracked
A = Added
M = Modified
git add: This is used to add file/s to the staging environment and prepare it for commit (save)
As you are working, you may be adding, editing, and removing files. But whenever you hit a milestone or finish a part of the work, you should add the files to a Staging Environment.
Staged files are files that are ready to be committed to the repository (remote repo) you are working on. You will learn more about commit shortly and how to create remote repo.
git add fileName
where: fileName is the name of the particular file you want to stage.
Here in our case, the fileName is index.html
git add index.html
How about the case where you have multiple files to stage and you don't want to start staging them one by one? In that case, use the **git add. ** (git add dot) or git add -A. This will stage All the files in the current working directory.
git add .

git add -A
git commit: Commits are the snapshots of your code changes. Adding commits helps to keep track of your progress and changes as you work. Git considers each commit change point or "save point".
It is a point in the project you can go back to if you find a bug, or want to make a change. Thus you can always go back to a particular snapshot (commit) of your code in the future.
git commit -m 'Add index.html file'
where: 'Add index.html file' is known as the commit message.
Hint: Your commit message should be descriptive of the changes you made. A good commit message will help you in the future to understand clearly what you did here if you come back to review the code or add new features.
Write the summary line and description of what you have done in the imperative mood, that is as if you were commanding someone.
Some guides on how to write good commit messages:
How to write better commit messages
Git status and Git Log
These two commands are VIP when working with Git. They give you a summary of all the changes or the changes you have done in each step. You can use them to check your files and commit history.
Running git status and git log in our index.html file gives the below outputs
git status

This shows that we have modified the **index.html **file since the last **git add **and **git commit ** operations.
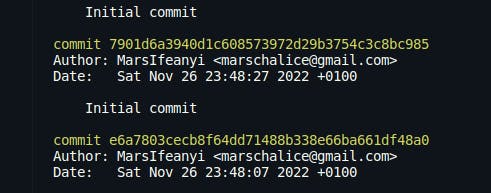
git log
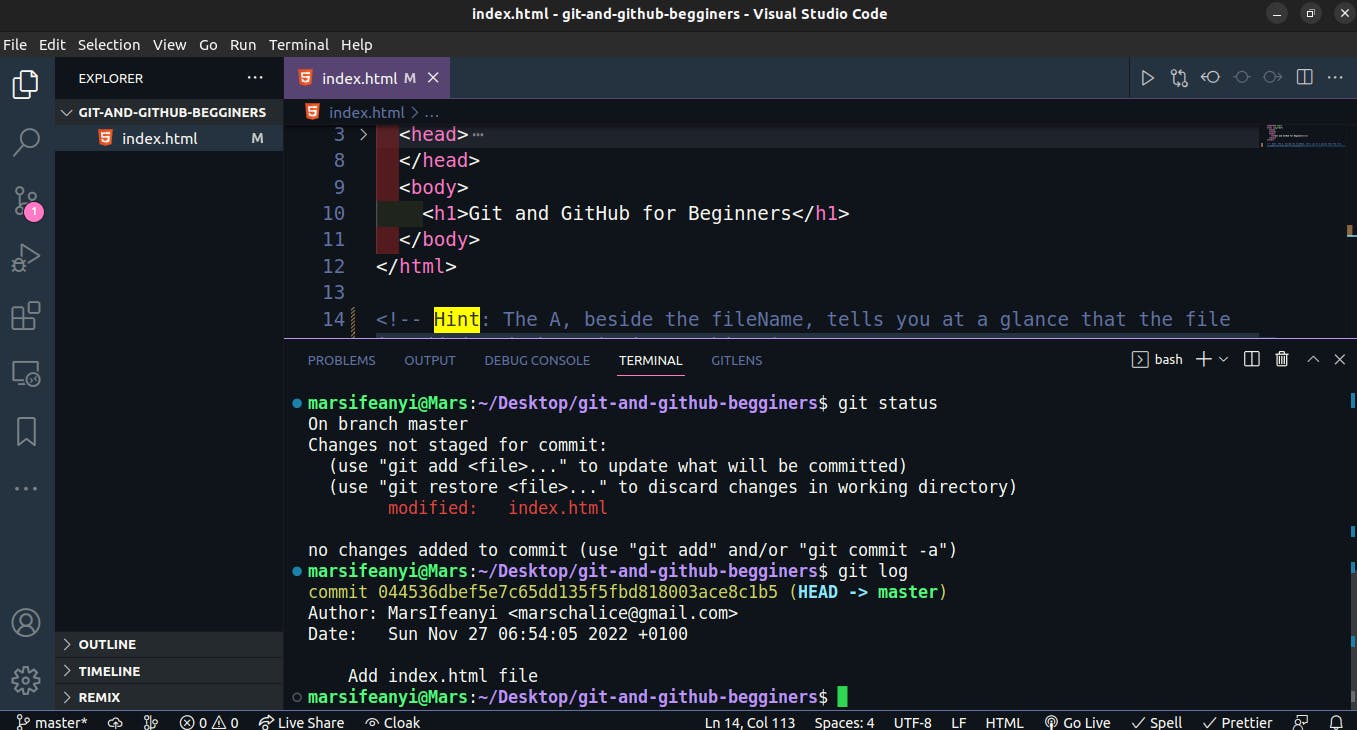
git log then shows us the Author of the commit, the commit Hash and the date the commit was made, and the commit message.
Now that we have staged and committed our files, is time to push them to the remote repo so that they will be stored safely there and also for our teammates to see it. But before we can push to the Remote repo let's first of all go to our Github account and create a new remote repo
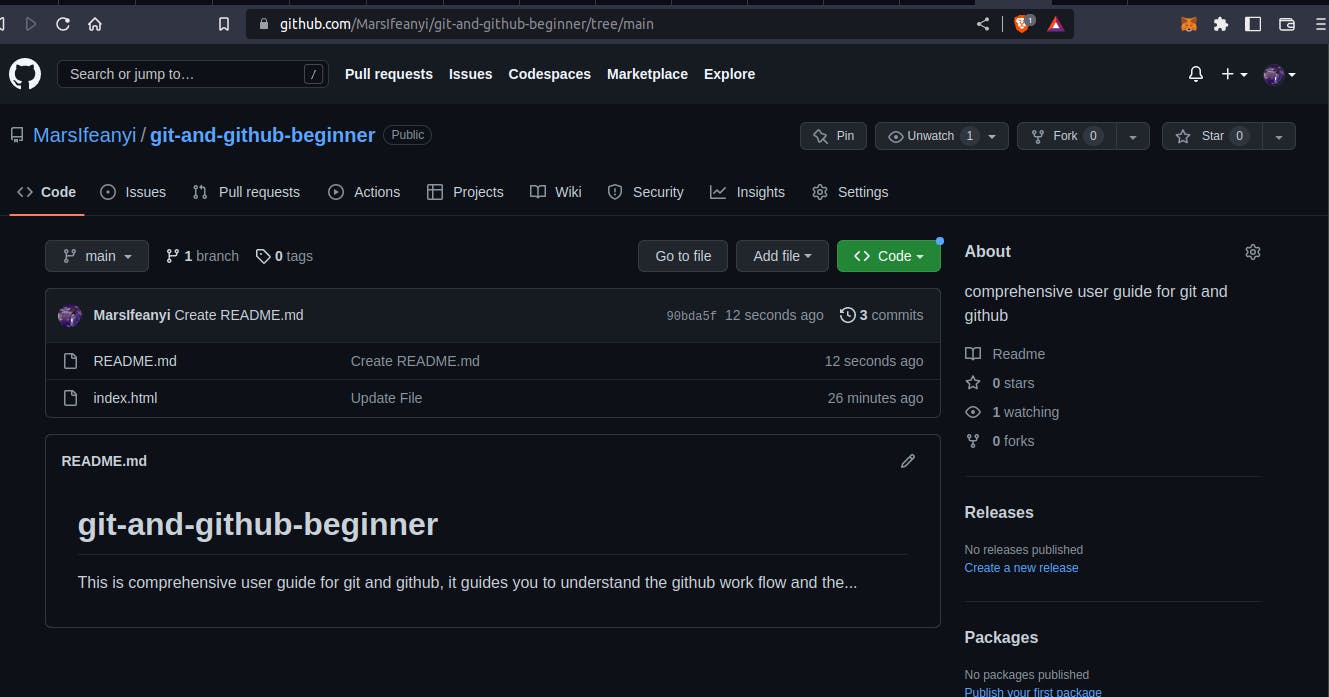
Creating a Repository on GitHub
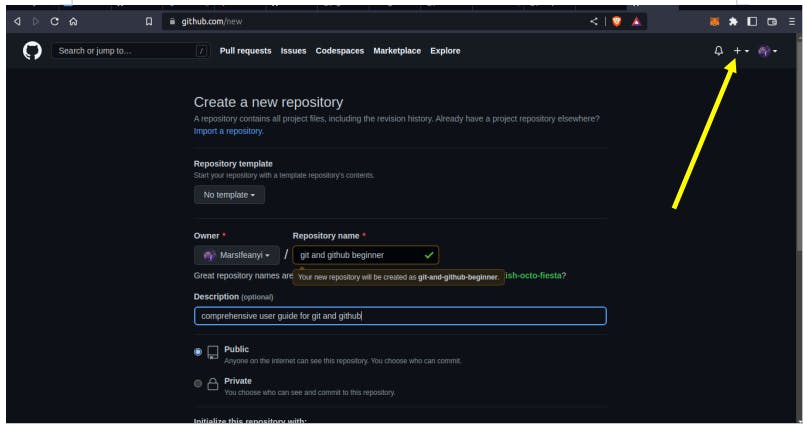
On your GitHub account, click on the **plus + **beside your profile picture and choose New Repository
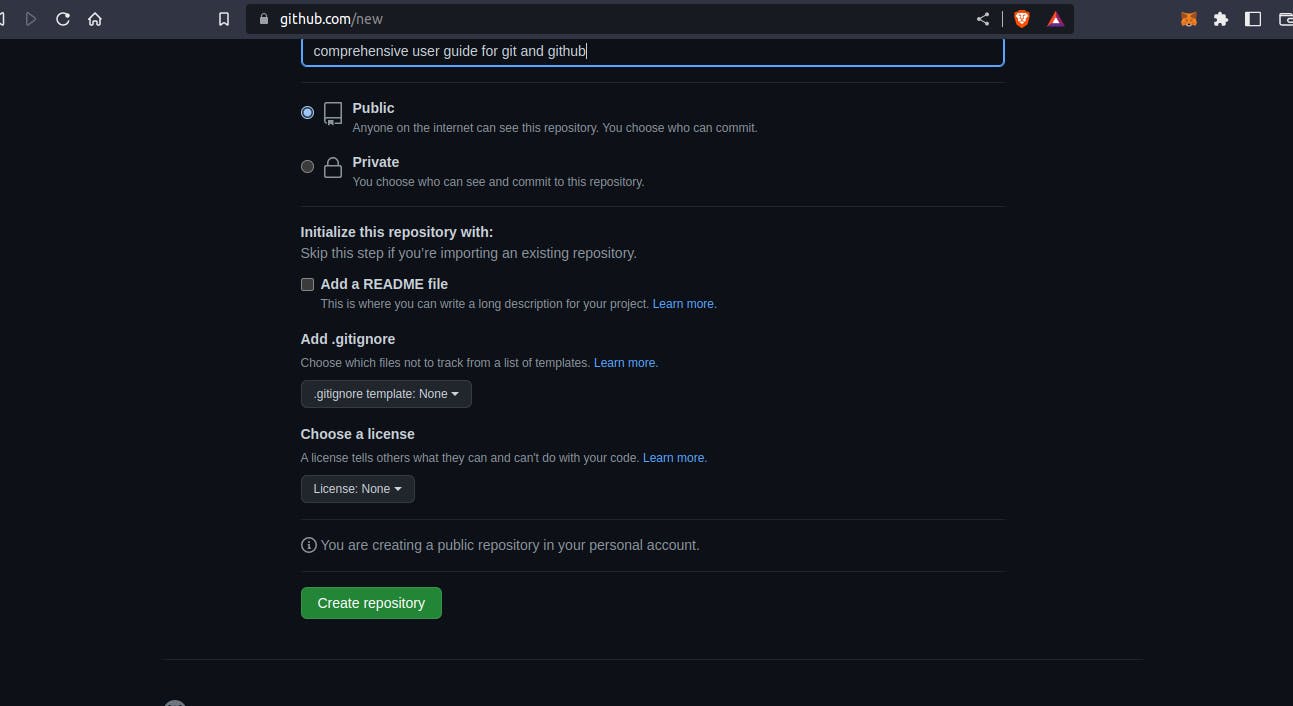
Then give your repository a Name and a Description, that shows what the repository is all about, then for now leave every other thing as they are by default.
This is what my setup looks like
Then, Create a repository
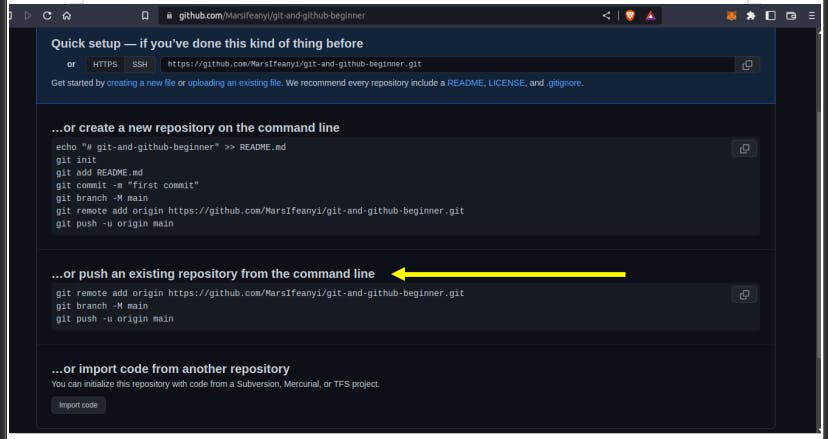
After creating the repository you will see the page below.
You will see various options but are going to use the second option (...or push an existing repository from the command line) because we have already initialized a repository using git init earlier in our command line/terminal
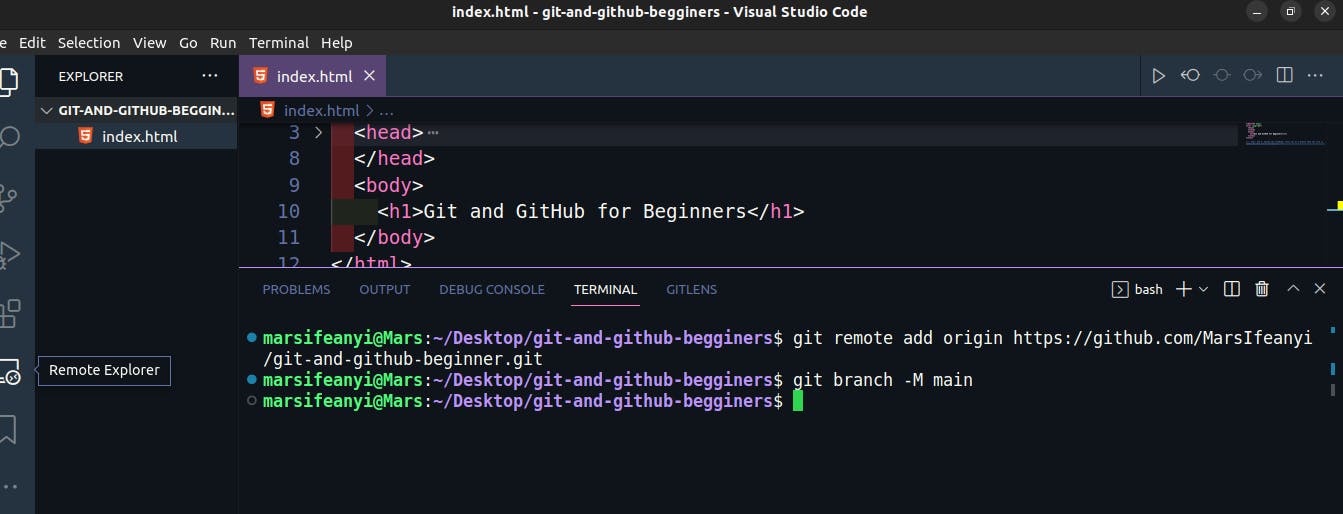
Connecting Local Repo to Remote Repo
Now that we have created a remote repo let's go ahead on our command line/terminal and connect the remote repo to the local repo we create earlier in our machine.
Remember, we are using the second option above, thus copy each line of the code and pass it to your terminal and press enter
Below is what my setup looks like:
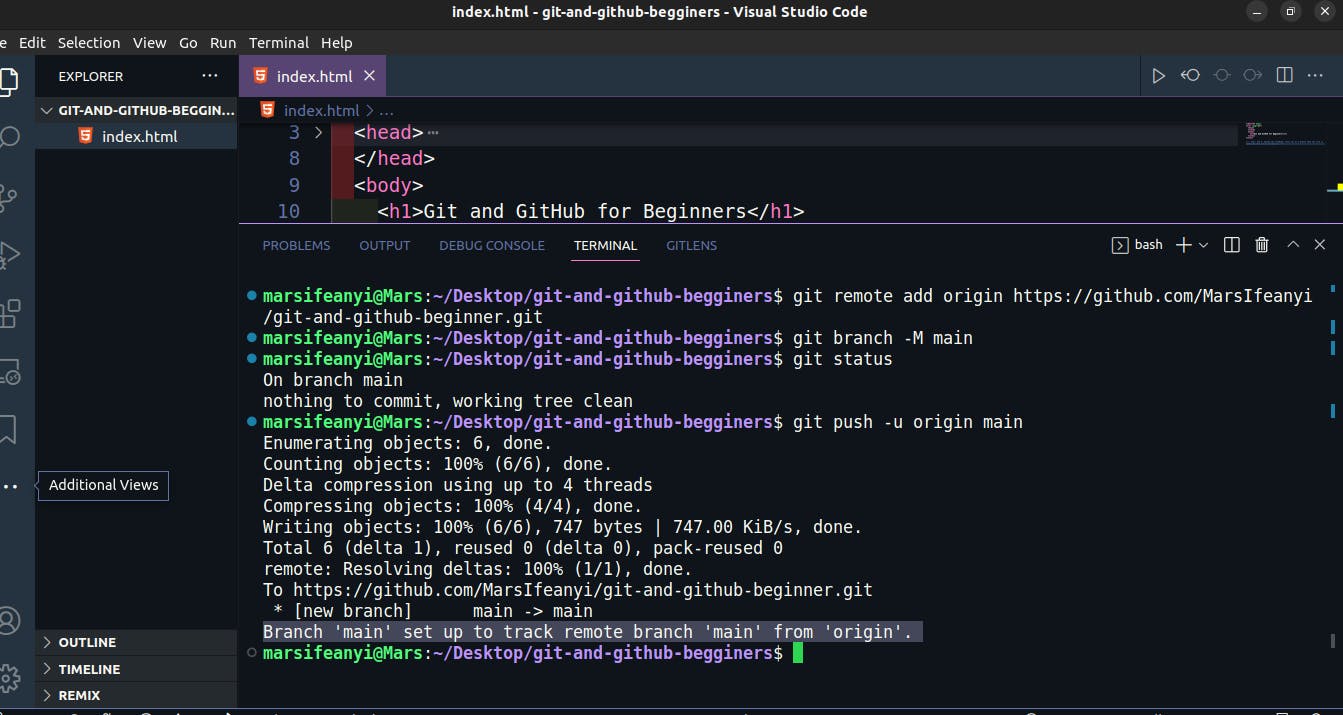
With these, we have successfully connected our remote repo to the local repo. But wait one more step, we need to push our local repo to remote upstream.
Git Pushing (git push)
git push: This command is used to push the files and code you have in your local repo to the remote repo. Remember you created a remote repo above, however, the repo is still very empty, there is no code or files in it thus with the git push command you will send all the staged and committed files to the remote repo on your GitHub
**Hint: ** The first time you are using this command (the first time you are pushing to remote repo) you will type it as:
git push -u origin main
The -u origin main, specifies where you are pushing the initial code to.
But for subsequent pushes, you just use the normal command
git push
This is what my setup looks like after using the git push -u origin main, command
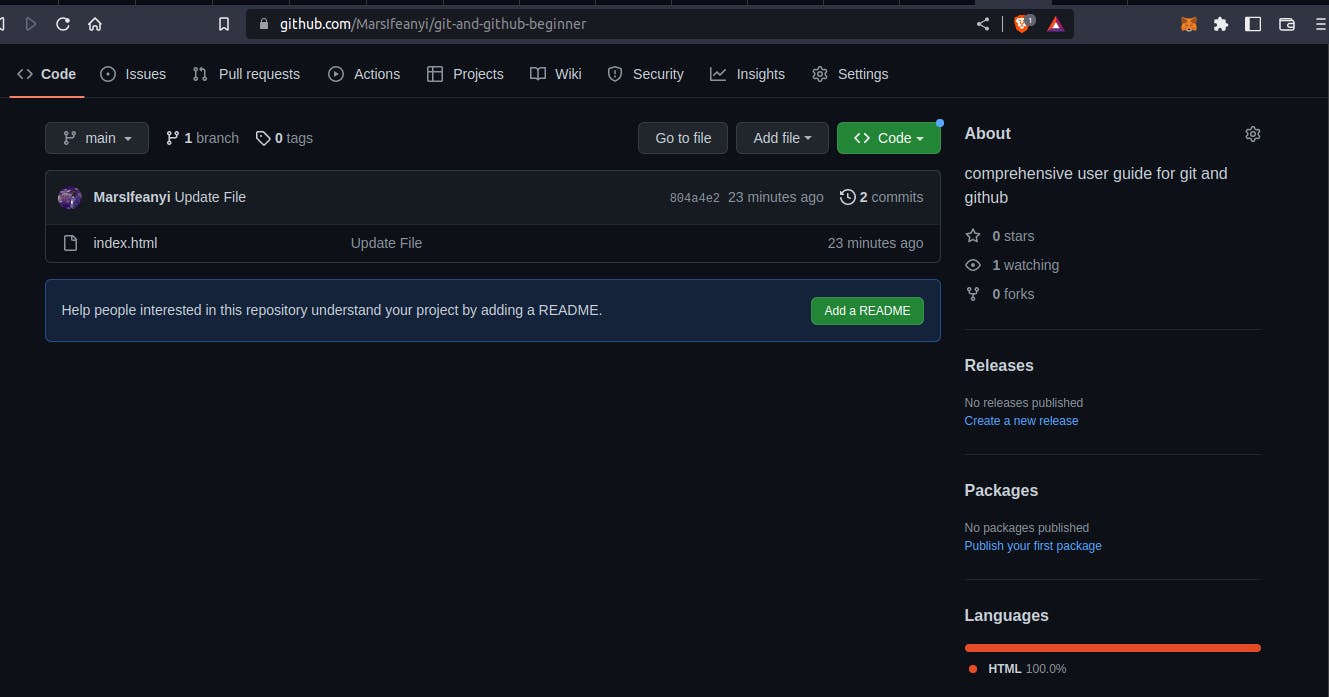
Now, if you go back to your GitHub and refresh your repo page, you will automatically see the file you added.
Yeyyy!!!, this is pretty cool, congrats, you have pushed your first update to GitHub
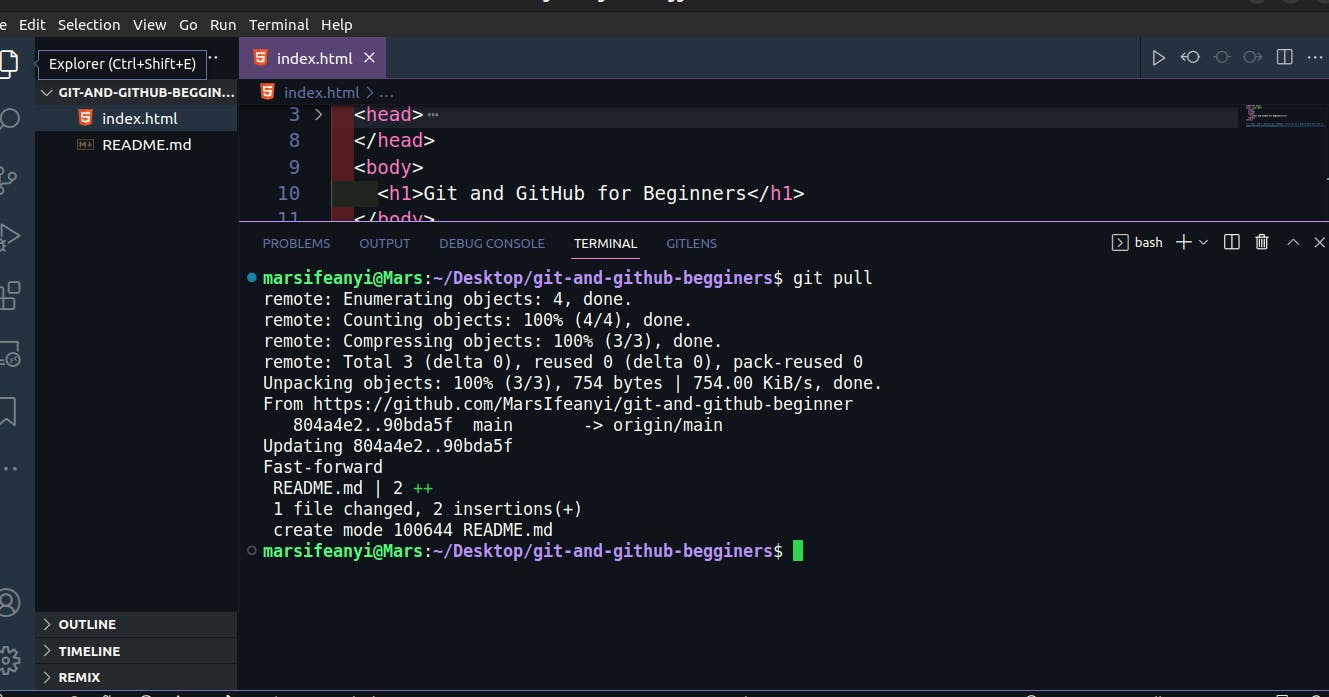
Git pull
This command is used to get all the changes in your remote repo on GitHub to your local repo on your machine (Laptop, desktop, etc).
How does this work?... Currently in your local repo on your machine you only have one file ie the index.html file. Let's go to our remote repo on GitHub and add a README file and pull this file to our local machine
This is what my setup looks like before and after adding the README file
For now, just write anything you like in the README and then scroll down and **commit changes **
Let's now pull this README file to our local repo
git pull
This is what my setup looks like. Now we have two files in our local repo instead of one. That's the work of git pull
Branching and Pull Request
git branch: This command is used to create a branch away from the main branch. As best practice the main branch is kept as a Single Source of Truth, thus only files, codes, or works that have been reviewed and approved should be there. Thus as you work in teams, you should always create a branch and don't temper with the main branch.
In creating your branch, your branch name should be descriptive to reflect the changes or updates you are adding to the existing app or Codebase.
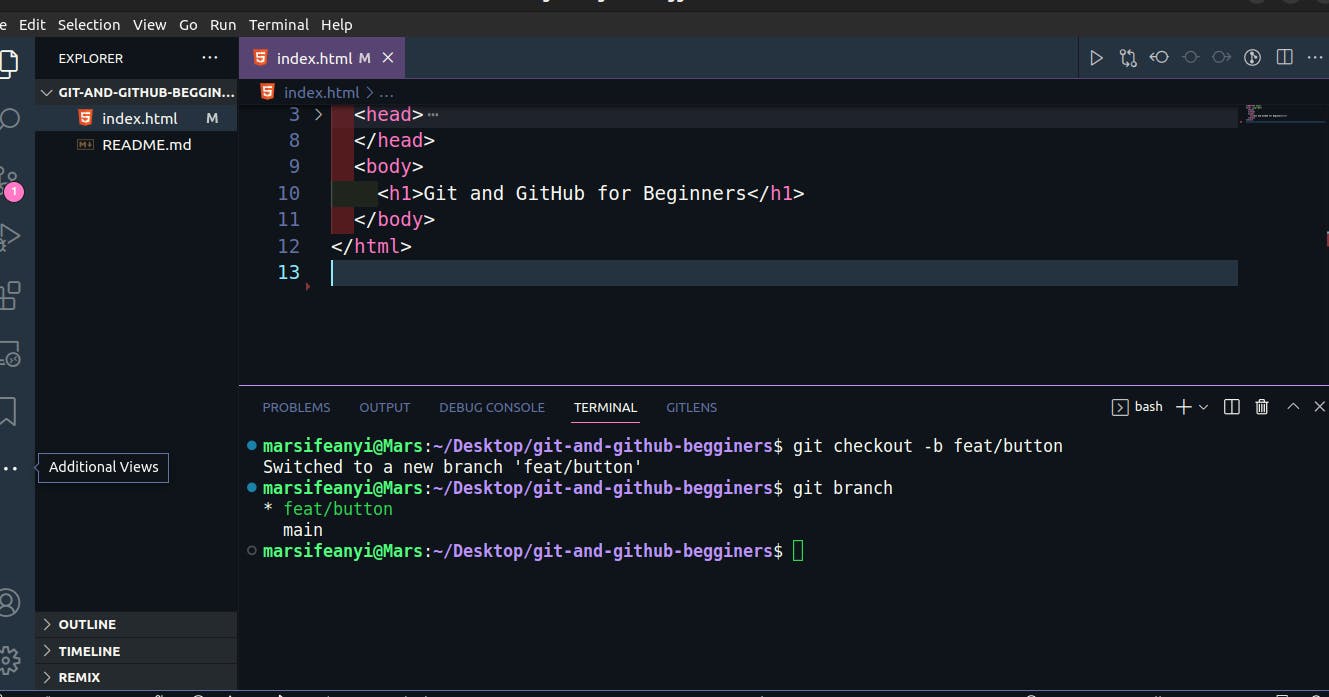
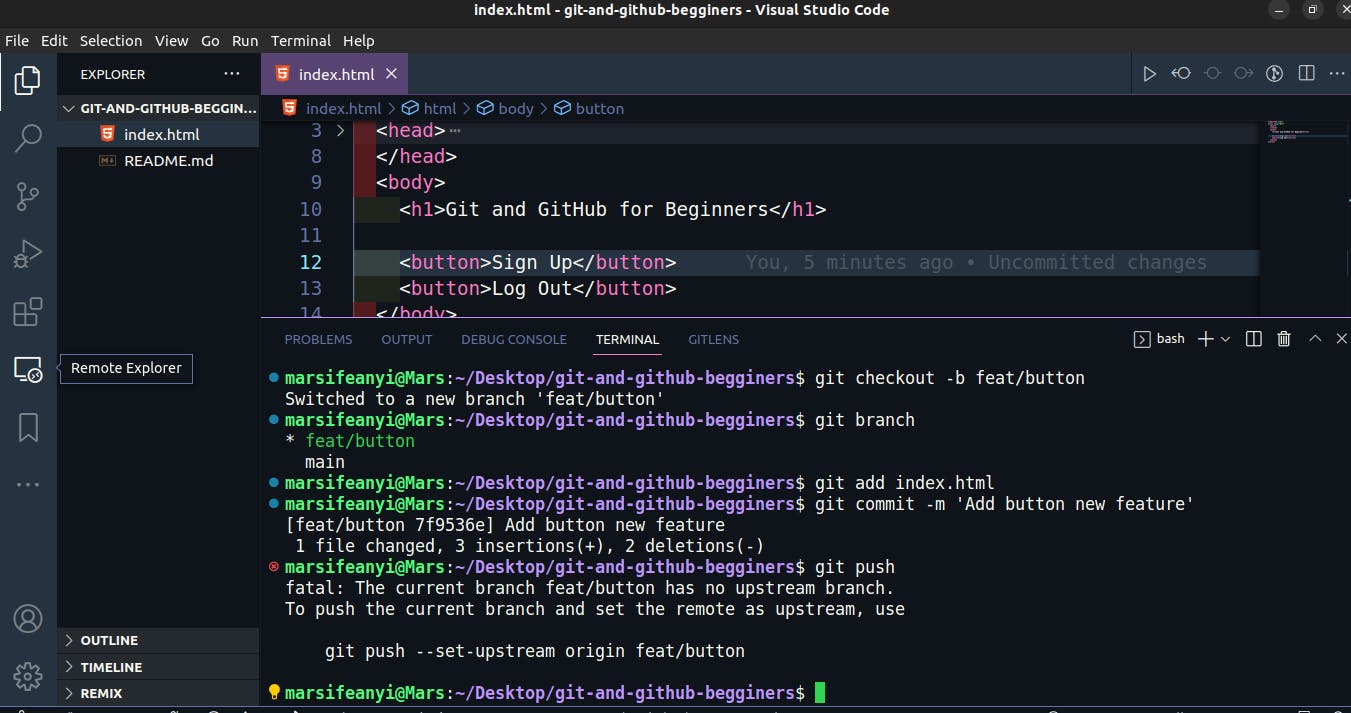
Now let's create a branch and in the new branch let's add a button as a new feature to the **index.html **file
git checkout -b feat/button
**Where: feat/button **is the name of my branch (give your branch a name that describes the update you are adding), here I want to add a button as a new feature.
To know the number of branches we have and the active branch we are currently working on use, the git branch command
git branch
The active branch is always styled green, here our active branch is feat/button
This is what my setup looks like.
Then go ahead and add the button feature and :
**git add **
**git commit and **
**git push **
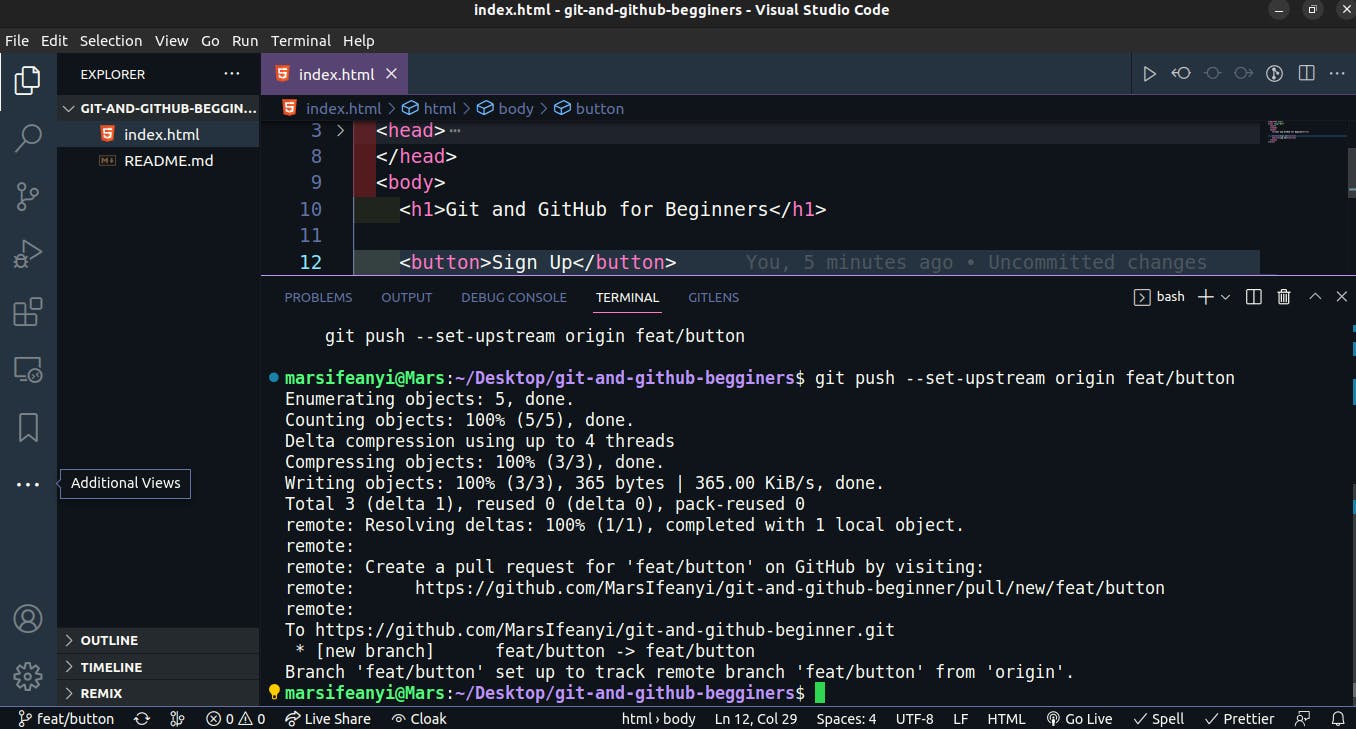
Hint: You will push with this command, git push --set-upstream origin feat/button since you are working in a new branch and we need to set an upstream for it first. If you use the normal command, **git push **, you will get an error and git will correct you on what to use
This is what my setup looks like from using git add, git commit, and git push
This is the new setup when the upstream is set using:
git push --set-upstream origin feat/button
Switching Branches
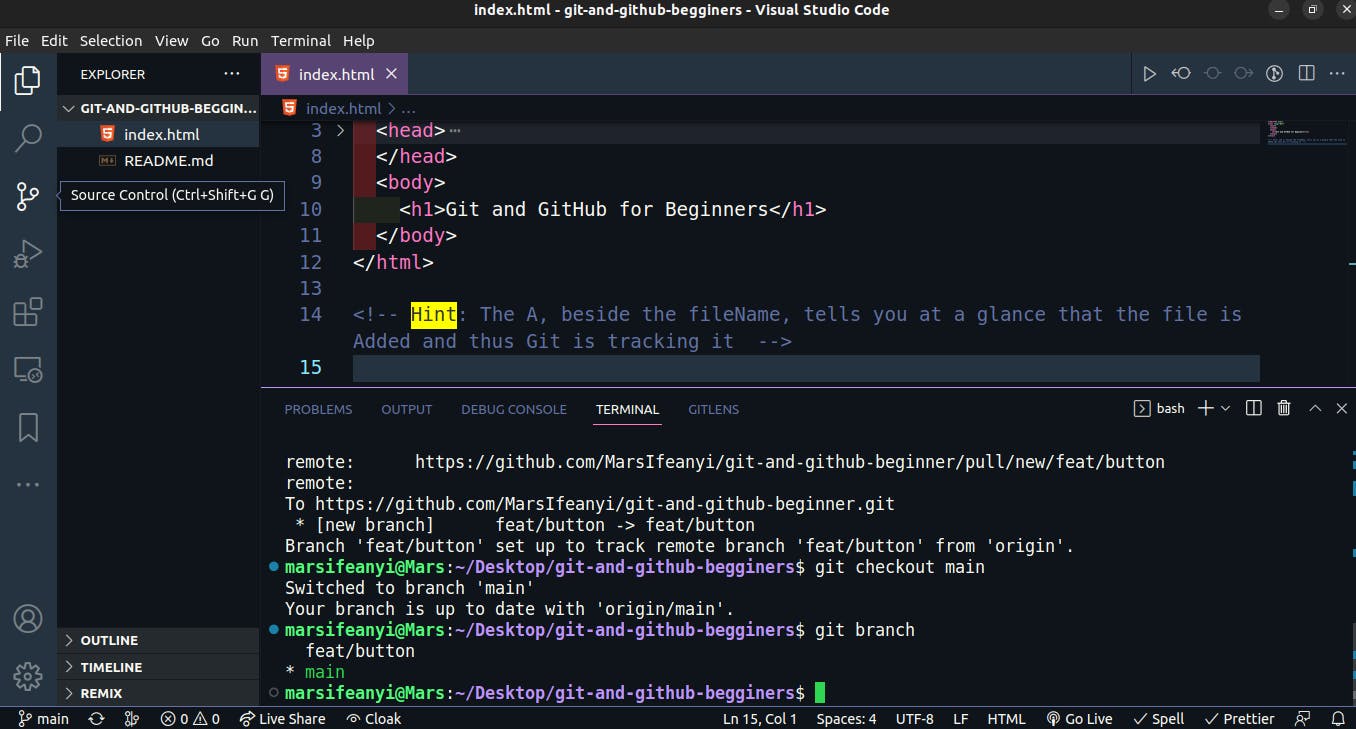
Currently, we are on the **feat/button **, to switch to another branch (here in our case the main branch since we only have two branches), use the command git checkout yourBranchName
git checkout main
***Hint: *** When you run this command, you will notice that all the features you have ie the buttons you added when you are on the feat/button branch are not showing here, why is it so?
Yes, that is the essence of branching, the updates will only show up in the main branch after it you have made a Pull Request and it has been approved by the Codebase maintainer, Reviewer, your Boss, or teammates...
This is what my setup looks like on the main branch
Now, that we have successfully created our feat/button branch, added the features, and push to git. Let's ask our teammate or Boss to review our code and then if approved, join it to the main branch, so that we can see the feature on the main branch. We can do this using Pull Request (PR)
**Hint: ** Always remember that the main branch is the Single Source of Truth, thus always create a new branch while adding new feature/s, especially when you are working with your Boss or teams.
"Thou shall not code on the main branch"
Pull Request (PR)
This is used to ask your Boss, the maintainer of the Codebase, or your team members to review the changes you made and either approve it or reject them with reasons.
If you go back to your git you will now see that you have two branches, as shown in the picture below. Now let's compare and pull a request

When you click on the compare and pull request, you will see the picture below. Write anything you like that tells the Code Reviewer, your Boss, or your teammates what changes or updates you made.
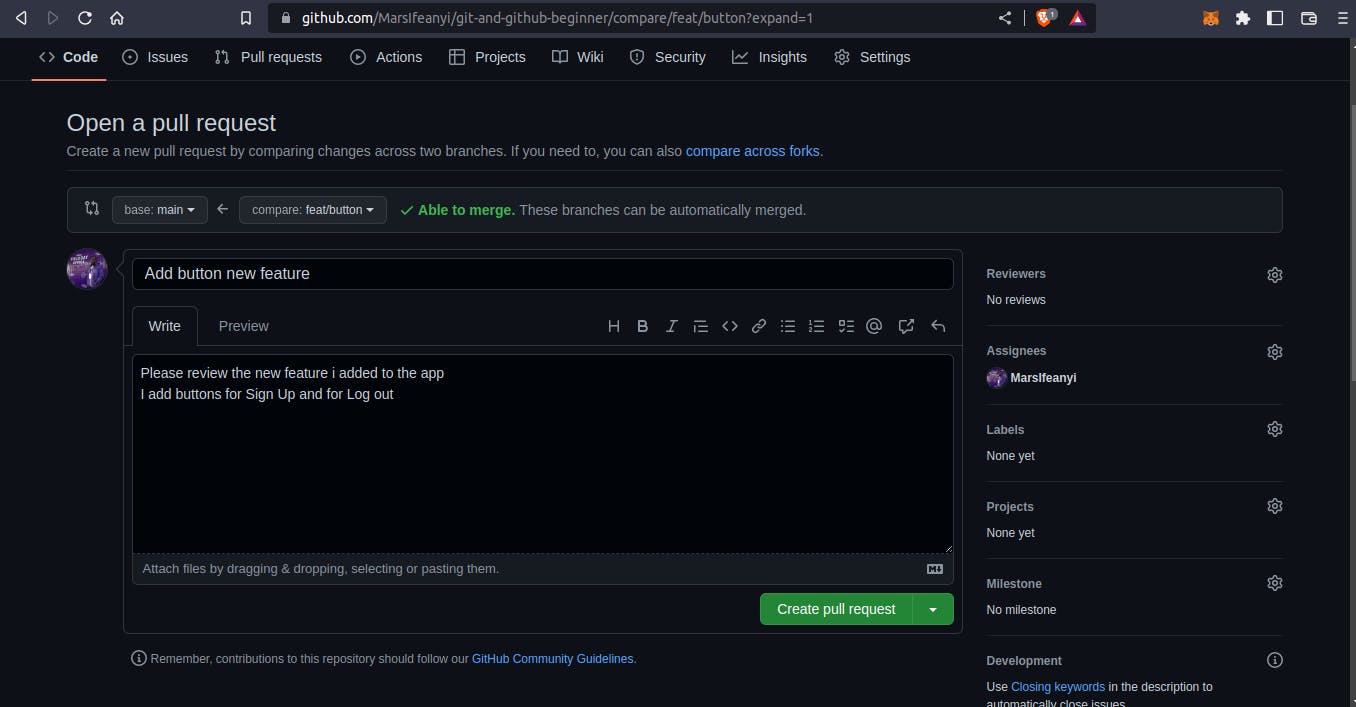
At the top-right, you will see the Reviewers and Assignees tabs.
In the Reviewers tab put the names of your team members, your Boss, or the maintainers you want to review your update. This will tag them to your PR and send them a notification.
In the Assignees tab, add yourself or any other of your team member that you work on this particular feature/s with.
Then** create pull request**... Then relax and wait for the reviewer/s to approve or reject your update with reasons.
Yeyyy!!!, you have done it... You have added git commands in your Arsenal and are now ready for managing your codes and collaborating with your team.
There are still other advanced git commands, that I didn't cover here, hopefully, I will cover them in part 2, but in the meantime, I have attached a git cheat sheet to help you out on the rest of the command.
Summary:
Let's have a quick summary of the Git and GitHub workflow you will be using daily as a developer:
git init
**git add **
**git commit **
git push
git pull
git branch
Pull request
GitHub Education Git-Cheat-Sheet contains all the git commands we have used in this article and other commands you will be using daily as a developer.
Till next time cheers!!!...